Assigning students to Zoom breakout rooms, for teachers

Our students need opportunities to speak in class, and Zoom’s breakout room feature is a powerful tool for doing just that.
In this post, we’ll give you an overview of your options for assigning students to breakout rooms. If you need help getting up and running with Zoom breakout rooms, check out our recent post, “Getting started with Zoom breakout rooms, for teachers.”
Our goal is to help you get past the mumbo jumbo of figuring out your tech tools, so you can focus on what matters: creating engaging and collaborative learning experiences for our students.
Option A: Assign students to groups on-the-fly.
Start your Zoom meeting. (Make sure you are logged into your Zoom account and that you are the “host” of the meeting.)
Click Breakout Rooms. Note that only hosts and co-hosts of the meeting can see this button.
Follow the prompts to assign students to breakout rooms:
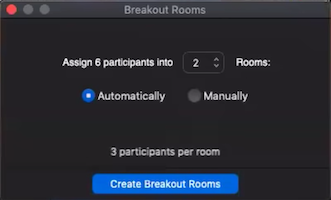

If you select Automatically, Zoom will assign students to breakout rooms randomly based on the number of rooms. Once breakout room assignments are generated, you will have the option to manually swap students between rooms before sending everyone off into their breakout rooms.
If you select Manually, you will be prompted to assign students to breakout rooms one-by-one.
✅ Pro-tip: You can reuse these group assignments as many times as you’d like for the rest of the Zoom meeting, unless you reset them. You cannot, however, save these assignments for future meetings.
5. Click Open All Rooms.
✅ Pro-tip: Before opening breakout rooms, I recommend enabling “Move all participants into breakout rooms automatically” to make transitions into breakout rooms smoother. This is especially helpful if you’re teaching young kids.

Option B: Pre-assign students to groups before class starts.
Go to the Schedule a Meeting page.
In the Meeting Options section, select Breakout Room pre-assign. Click Create Rooms.

3. Press the + button to add a new breakout room, and then assign students to each room by typing in their emails:

✅ Pro-tip: You can add students’ emails whether or not they have a Zoom account.
4. Click Save to save breakout room assignments and then click Save again to save the meeting settings.
5. (Optional) Save these breakout room assignments to your computer so you can reuse them in future Zoom meetings:
Under the Breakout Room section, click View Detail:

In the bottom left corner, click Export as CSV to save these breakout room assignments to your computer:

Next time you schedule a class meeting (see step 2), instead of clicking Create Room, just click Import from CSV and select the file you saved.
What’s next?
Okay, so you’ve figured out how breakout rooms work. Now, how are you going to use them to foster deeper learning in your virtual classroom? Check out other posts on the TeachFX blog for ideas and tips.